Wednesday, December 28, 2011

the gifts! the gifts! they've been hung up!

So, remember how I told you my sister has an obsession with buying bows for her daughter? An obsession so intense that she asked me to create a "Hair Bow Holder" for her daughter?  I posted about it originally here.  Well, here's the final product all hung up and loaded up with only some of Eden's bows.  Yeah, that's only SOME of her bows. Should I say it again to allow it to sink in? SOME! Holy Cuh-RAP! That's a lot of bows!


Anyways... (yep, that's my segue).

My sister also hung up Eden's Christmas gift - the yarn wrapped letters with felt flowers.

Do you like??
 

Okay, so back to the bows. 
I've been asked to create another bow holder for the little Miss so that ALL of her bows can be accommodated.  I'll try to do a better job on the tutorial for this 2nd round :).

watching top gun,

the craft rookie

p.s.  Mav: Tower, this is Ghost Writer requesting a fly-by.
Air Boss: Negative, Ghost Writer. The pattern is full.
 Goose: No. No, Mav, this is not a good idea!
Mav: Sorry, Goose, but it's time to buzz a tower.

Monday, December 26, 2011

Eden's Christmas Gift

Okay, so I've been waiting since October to be able to share with people what I gave to my niece for Christmas this year!  She'll be 5 months old this week, so it's not like she can truly appreciate this gift.  BUT, it is something that she can love for a very long time [at least that's my hope :)].

So, this gift originated from my love for Pinterest - does this surprise anyone? HA!

I found some yarn-wrapped letters here, and the idea was born!  It's an etsy shop, but I didn't want to just buy the letters - I wanted to make them!  I wanted to create something for her.  Little did I know, back when I started this project, that it takes FOREVER to wrap things in yarn.  This is something I learned on Thanksgiving Day, with my yarn-wrapped wreath, but, again, I started this little project for Eden in October!

Okay, so here's how it went down:

I saw the post on Pinterest that led me to that Etsy shop.  I thought to myself, "Hmmm. That's kinda friggin' adorable.  I'm gonna do that for Eden. Let's go get supplies, self!"

So, off I went to Hobby Lobby. **Sigh, I love that store.**

The supplies I bought:

- Chipboard letters - E-D-E-N ($1.99 a piece)
- Yarn - I bought pink, not expensive
- Felt
- Hot glue gun (no I did not have one prior to this...this blog is called craft ROOKIE for a reason, ya'll!)
- Extra hot glue sticks

Things I should have also bought, but, sadly, did not:

- Bandaids
- Burn Cream

Alright, then I started wrapping. I'll show you the process with the letter "N" as in "Now let's get started" or "No, I don't think this project will take that long to complete" or "Na-na-na-na, Hey, Hey, Hey, GOODBYYYE!"

So, to start wrapping, I hot glued the end of the yarn on to the back of the letter.  Then, I just kept wrapping in straight lines.

Once I got both vertical pieces of the "N" done, I did the cross-section. I only did the part of the cross section that could be done before I ended up hitting the vertical sections with my yarn.
Then, I started wrapping in the opposite direction - horizontally.  This is HUGELY important. Every section of the letter should be wrapped twice - once each direction, horizontal AND vertical.  If not, you end up with some pretty major gaps where the chipboard shows through.

Just keep wrapping...
                    and wrapping...
                                and wrapping...

                                             and wrapping....
                                                        and wrapping...
                                                                   and wrapping... :)


The last section I worked with was the cross section, again.  I just wrapped around that center piece once more to cover up the other layers that all converged on this section of the letter.

Okay, once you've got the letters wrapped...then comes the embellishments (aka the "decorations").

We'll go in letter order this time :)

"E" for Eden!
Here's the first "E" before the extra love was added..


This is the flower that I ultimately put on the "E"...


Here's how to make it:
1. Cut out 3 different size circles with curved edges all around. 

 2. Hot glue them together in a stack.


 3. Add a button of any color.


4. Glue the final product on to the letter.


5. Make as many as you'd like.  Glue them on, too!

"D" for Den!

Here's the "D" before the pretty additions...


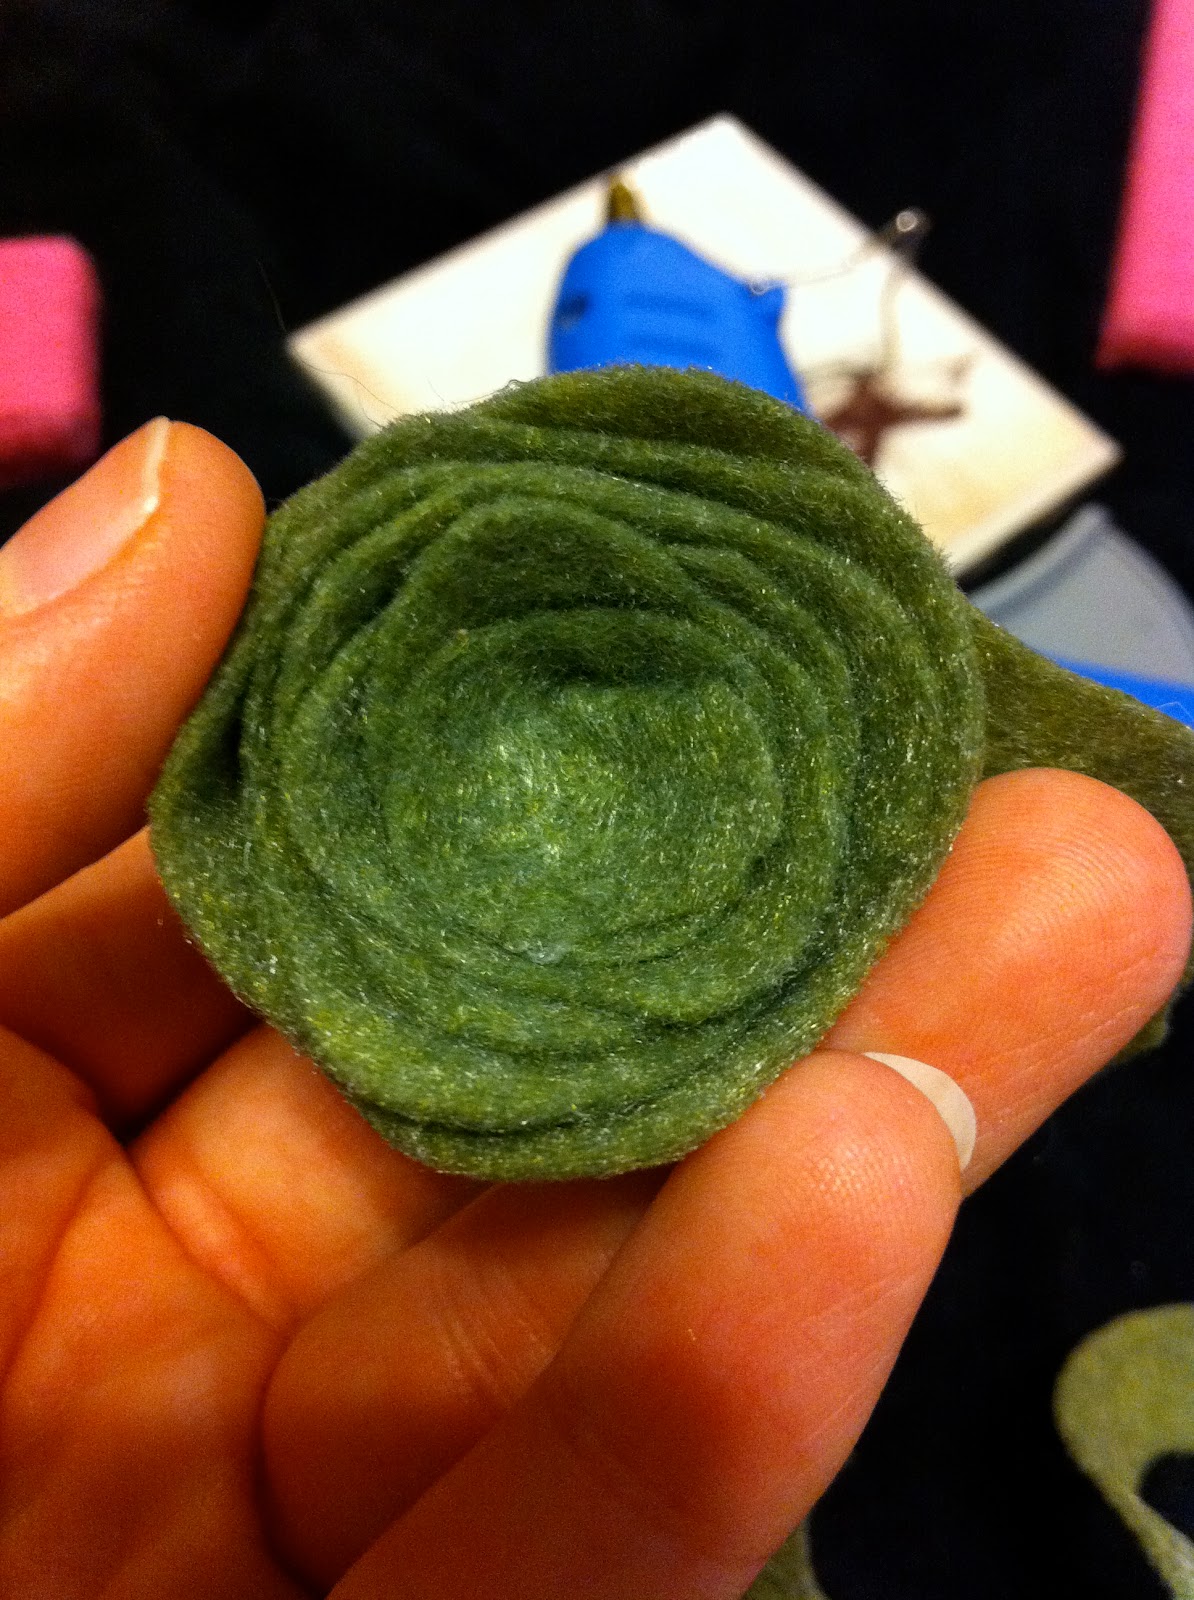
Here's the flower I put on the "D"...


Here's how to make it:

1. Cut out a REALLY big circle...or do your best to make it a circle.  I'm not exactly a "Measure twice. Cut once." kind of girl :)


2. Cut in a spiral pattern, starting from the outside towards the center like so:


 3.  Start from the center of the spiral that you cut, and wind it around itself.  Hot glue at every point! Remember, though, "A dot of glue is a lot of glue!"


4. Add button(s) and glue it on to the letter...


5. Add as many flowers as you'd like with the same pattern.

"E" for EN!
Here's another photo of the "E" before the pretty stuff...


Here's what the "E" looked like when I was done...


Here's how to make the flower:
1. Cut out 6 leafs - exactly the same.  To do this, I cut out my first one, then used it as a stencil to cut out the others.


2. Glue them in a pinwheel pattern

3. Add a button in the center, and glue it on to the letter...


4. The rosette flower was something I made a while ago. My "How To" can be seen here.

"N" for, well, N!

Okay, so I don't have a photo of the "N" when it was done getting wrapped and before the pretty-ness, but here's a photo of it all wrapped but with one little addition...


Here's what it looked like when it was all done and such...

Here's how to make the pretty things...

1. Cut out small circles - a lot of them.  I did 6 of each color.


2. Take the circle... and fold it in half...


 3. Then, fold it in half again, and hot glue it in the center to hold it that way FOREVER :)


 4. Repeat this step for all of the mini circles that you cut out. Then, glue them on to your letter as you'd like! Be careful not to burn yourself on this one.  I think I burnt my fingers about 5 times...you would think that I would have learned after the first time!


 Now, sit back, and observe your beautiful creation :) 


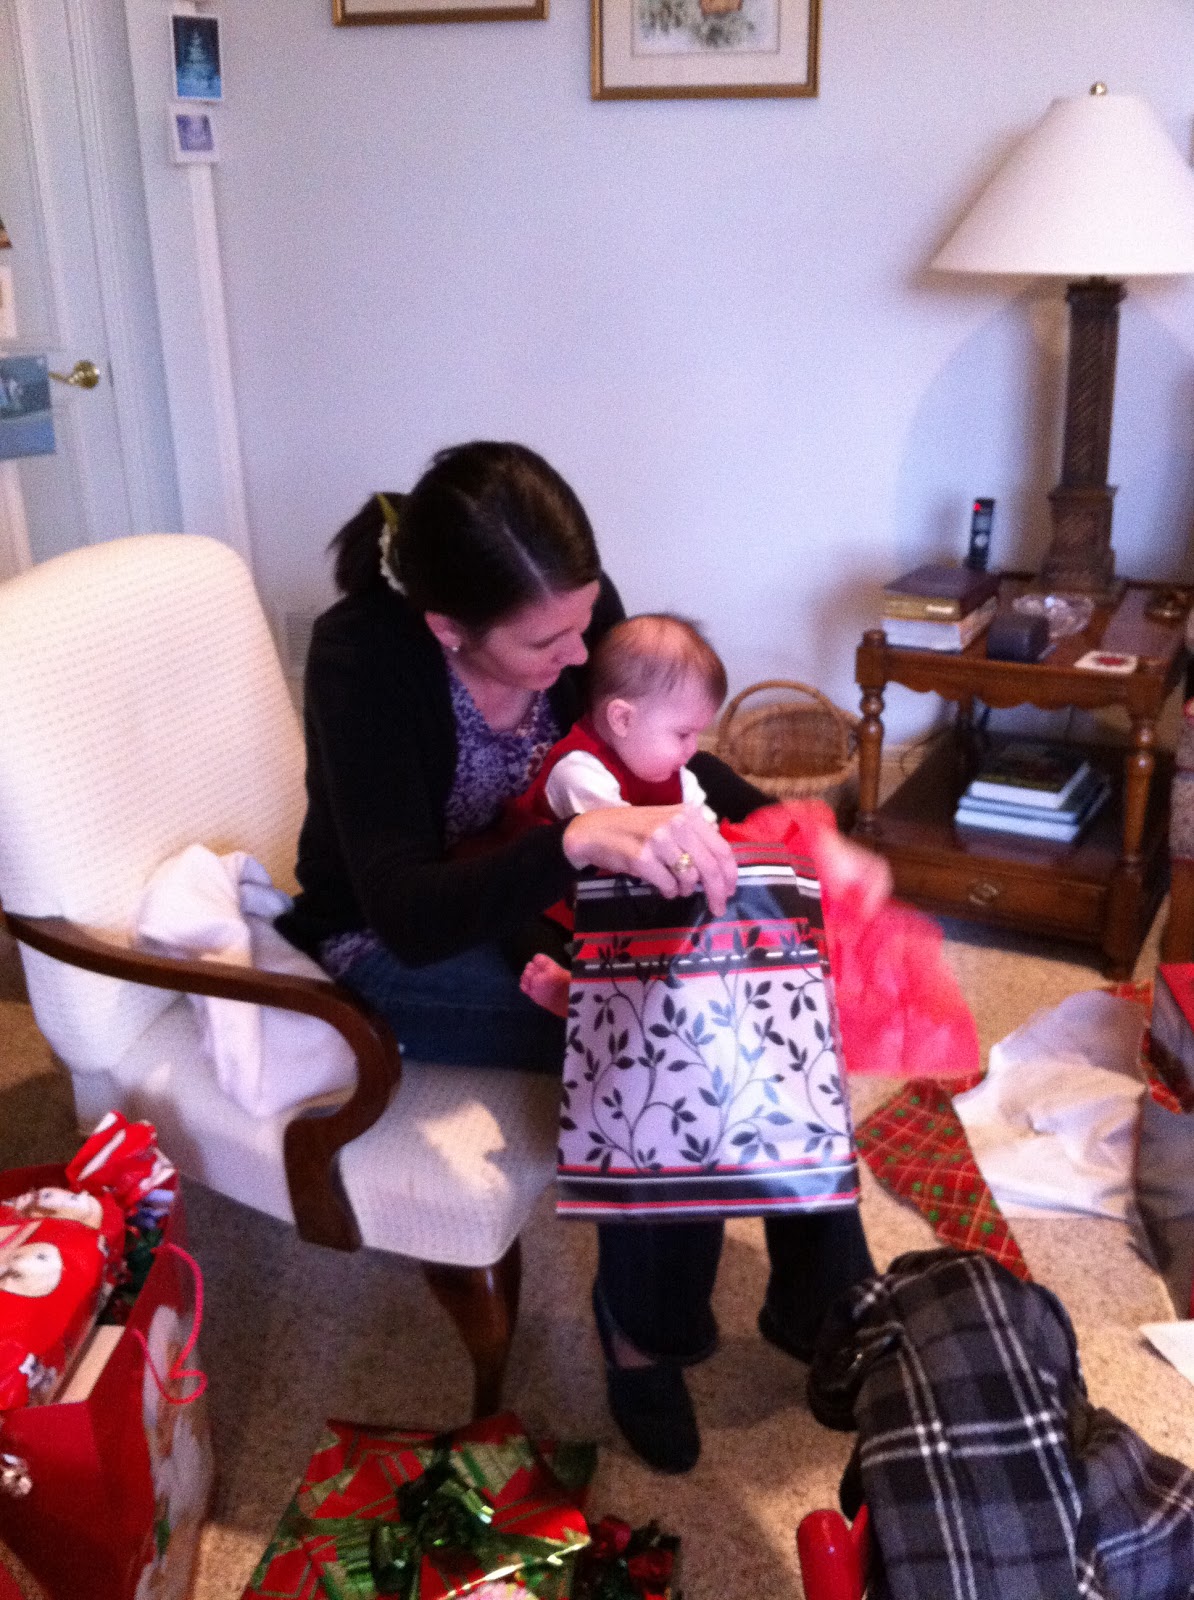
Then, wrap it up, and give it to your cute little niece to unwrap...


And take pictures of her cute little self with the letters!

How cute is she???

a happy aunt,

the craft rookie

Sunday, December 25, 2011

mewwy kwissmus

Okay, so another loaded post. Here we go...

Friday
Do you remember those neighbors who helped jump my car on Thanksgiving Day?  I first talked about them on the day of crafting post, and then I showed my gift to them on this day.  Well, they have surprised me yet again!  I was out shopping, and when I came home, this is what was waiting for me:


     They baked me cookies!


                 And they sent a card with it!


Fast forward to Friday night....>>>>>>>>>>>  <- those are my fast forward marks...


My current roommate went out of town again.  So, you know what that means! Yep....the cat slept on me for the past few nights! This is completely an aside...let's get back to the action!


My roommate from a few years ago, Stephanie, had a Christmas party at her new place in Uptown. It was a "Tacky Sweater" Christmas Party.  I was so excited to go because I haven't seen Steph since April!  One small dilemma...I don't own any tacky Christmas sweaters, something I am very proud of, actually.  So, instead of wearing a tacky sweater, I just dressed festively.  However, I was VERY uncomfortable in those clothes, and by that I mean that I need to lose some weight (ugh..).


So, when I got there, Stephanie let me borrow some of her clothes.


She gave me a dress and some Reindeer antlers that light up when you press a button - they were an awkard moment saver all night long! Steph (isn't she beautiful??) dressed up as a Christmas present.  She wore that box around all night long!


Saturday
Christmas Eve.  I finally wrapped my presents!  But, more importantly, I spent the entire day after that CLEANING my room, bathroom, and office!  Not only did I clean, though, I also ORGANIZED!  OOOOOOOHHHHHHH MY GOSH! It felt so good to get organized!  I'll post pictures when the project is completely done - I have to go get my label maker from my classroom to get the finishing touches.  I'll post some before pictures (which I'm actually quite embarrassed of) and the after shots so you can see just how much progress was made!

Fun fact: While I was cleaning, I accidentally stepped on Berkely the cat's little paw!  She yelped and went running!  She ran under a chair and tried to hide from me, and when I went over to kiss it and heal the wounded foot, she ran off again and hid under my roommate's bed!  She finally came out about 10 minutes later, and decided spending time with me wasn't the best idea.  So, she took some cat naps on the chair in the Family Room.  And by "cat naps" I mean that she had her head down and eyes closed, but every time she heard me coming, I got the MAJOR stink eye.

Observe...
Usually, when I walk by, she picks up her head and meows at me to come pet her.  She was TICKED! I'm happy to say that she has since forgiven me...or forgotten, I don't really know what the research says about cat memory...

Saturday night, I went out to my favorite bar - The Fillmore Pub in Downtown Plano, with my friends Destre and Matt.  This is a Christmas tradition with my friends and me.  We've gone every year for the past 3 years on either Christmas Eve or Christmas as a way to celebrate with each other after all the family time has gotten to us!

It's the best bar that I have been to in a while.  I've been a regular there for a little over a year, so I went to the bank and withdrew a Christmas tip for my bartenders.  I also shared the wealth of the baked goods my students brought me for Christmas this week.  I don't need to be eating any more sweets!

If you ever go, Dan and Erik are the best bartenders, and if you enjoy sarcasm, you'll truly love them!  Just don't tell them I gave them a compliment.  I don't want it going to their heads :)

Anyways, back to the story. Santa showed up at the Fillmore! Here's some things I learned about Santa last night:

1. Santa drinks
2. Santa smokes
3. Santa has a hard time walking when steps are involved (which may or may not be related to item #1.  The jury's still out...)

Since a celebrity showed up, we had to get the obligatory "fan" photos:

Destre, Santa, and me. (Sorry for the blurryness!!)
Santa and Matt.


Promises
I promise to:

- post photos of the embarrassing before and happy after shots of my cleaning/organizing day
- post photos of my Christmas present to my niece.  I finally finished this project, and LOVE how it turned out!
- lose weight

A note...

The entire time I've been writing this post, Berkely has been trying to get my attention and some much-needed pets.  This is how she goes about letting me know...


"Hmm...what's this thing??"

"Hey, you! Look at me!  Pet me! Love me! Meow..purr..purr..meow!"

"Look, Sarah!  I can do a handstand!"
And now, for the funniest picture of the day...


This was Berkely this morning.  Ignore how GROSS I look - I had just woken up, she was laying on me, and I snapped this photo just in time!  Can someone please caption this photo?!?!


jlaskg <-- Berkely typed that,

the craft rookie