Wednesday, November 30, 2011

this week...


...has been rough.

What a whip to come back from Thanksgiving Break!  My brain is still thinking is Turkey Time, and I just want to sleep some more!

Should I feel bad that I'm starting my countdown to Winter Holiday now?  Only 15 more school days to go!


Speaking of school...


We had a baby shower at my school today for a couple of the ladies that are with child :)!  I swear, babies are all around me - first my sister, then my brother and his wife, and now my co-workers! So exciting for them, though!  Both ladies are having little girls, and we had fun discussions about bows and how easy they are to make (thank you Thanksgiving craft day)!


Anyways, I bring up the shower because we had to bring different food items for everyone to snack on.  I got ZERO pictures of the food because I'm not a photo person - a skill I am quickly realizing I need to work on because of this here blog.

A few of my team members brought these really delicious dips - I think the hit of the day was Mr. Smith's 7 Layer Dip.  It was DELICIOUS!  He had refried beans, sour gream, quacamole, diced tomatoes, and bell peppers (I think) in it.  Needless to say, it was gone almost as soon as it was put on the table!

I was able to bring a recipe that my mom usually makes for get togethers with family and friends.  Every time I've seen her make this delicious treat, everyone wants the recipe.  So, here it is:

Cucumber Dill Sandwiches
2 pkgs of Cream Cheese (8 oz each) [I use Reduced Fat]
A few "dollops" of Mayonnaise [Again, you can go healthy here, too and get the Lighter versions]
1 pkg of Dry Italian Mix
3 large cucumbers
1 can of Dill Weed for seasoning
2 boxes of Melba Toast (any flavor)

In a Medium bowl, combine the Cream Cheese and Dry Italian Mix.  This will be tough to stir, so, slowly add 1 dollop of Mayonnaise and stir until the mix becomes "spreadable." If it's still tough, you can add another half spoon of the mayo. I don't add more than a spoon and a half of it.

Set the bowl aside and cut up the cucumbers into slices.

Spread some of the Cream Cheese mix on a piece of Melba toast. Put a cucumber slice on top of the spread, and sprinkle some Dill Weed on top of that.  Enjoy!

Note:  You can use any kind of cracker that you like.  I've even seen my mom use Rye Bread and Whole Wheat Bread - as long as it is a little more tough than your average loaf of bread.  

When I made it today, I had about 10 of my co-workers ask me for the recipe.  It is very light and just makes people want to come back for more!  SO GOOD! You can thank my momma for this contribution :)

Elf On a Shelf Update
Photos to come! 

Sunday, November 27, 2011

Sunday, lazy Sunday


I don't have any actual crafts to post about this time.  It's Sunday, and I've decided to be lazy :)  Although, there's a cute Pine Cone Elf pictured below that my roommate made with a list of materials that she used.

First, I'd like to show you what happens when my roommate goes out of town for a night.


Her cat, Berkely, gets lonely and falls asleep on me.  This is what I woke up to this morning...I guess I'm lucky that I love that cat, otherwise this would probably get annoying!

This next part is going to be about my roommate.  So, I figured I might as well give you some background on her.  Her name is Ashley, she graduated from Texas Tech (which affords interesting conversation on College Football Saturdays), and is an Art Teacher at the Middle School I worked at last year.  

She and I are very different.  One of my favorite stories to tell about our differences is that she is super into decorating for every holiday.  No matter what it is, she wants to have a decoration around the house to acknowledge the event.  So, when Halloween was approaching, our house had pumpkins galore, fall leaves on the mantle, more pumpkins, and more fall decorations. 

Me being the question-asker that I am, I asked her, "Why do you put out all these decorations? You put them up just to take them down a week later.  That seems like a lot of work!"  

Her response?  "You (pointing to me), Math teacher.  Me (pointing to herself), Art teacher."

That statement right there pretty much summed it all up for me, in addition to making me laugh pretty heartily. The only thing I could say in return was, "Agreed."

I've told you about my roommate because, yet again, for another holiday, she has decorated our house.  I guess it's nice that she does that because if it were up to me, the house would look the same year-round (maybe with a few furniture items rearranged because I get bored easy).

She has created a little pine cone elf that, originally sat on the mantle.  This has become our very own "Elf on a Shelf" because she so desperately wanted one, but opted for making one instead since she doesn't have any kids to buy the real thing for.

When she made it, I decided that I would take on the role of changing our Elf's location every day. 

Here are a few of the options I've used so far:

Day 1: Elf rollercoaster.  He sure liked the extra kick of caffeine at the end :)


Day 2: Elf on a Vase :) [honestly, I thought this was a Candlestick holder at first...and I put him there because he's "hot" like a lit candle].  By the way, that's my roommate in the background.  
 
Day 3: Elf Church!  It is Sunday after all.  Notice the "Elder" Pine cones with Stars in the back row!

Day 3 (continued): The Elf Church Bulletin :)

That's all I've got at this point.  I'll try to post more about his adventures!  

If you would like to know what he is made of to make one of your own, his body is obviously a pine cone.  His hat, gloves, boots, and scarf are made of felt.  He has little tiny bells at the tips of his shoes, and his legs and arms are made of pipe cleaner.  His little head is a wooden sphere with permanent marker eyes. I think she used fabric glue and super glue to put him all together, but don't quote me on it.  Just go with whatever adhesive you have on had.

The last thing I wanted to share with you for today is that I'm starting a new workout regimen.  I've gained weight (as I usually do when it gets cold), and I'm not happy about it.  So, I went on a walk tonight all around my neighborhood.  

I walked by some houses that were decorated for Christmas in ways that I admired.

 I mainly admire this house for being so darn bright!  I bet it can be seen from space.  There are very few street lamps in my neighborhood, and this house definitely lit my path as I walked by.

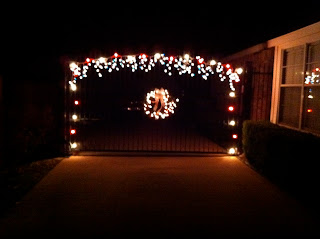
Many of the houses in our neighborhoods have gates that block their driveway.  So, you can see the gates from the street in the front of the house.  One of our neighbors decorated their gate with garland and lights! 
 
I hope you've had a lovely Sunday!

the craft rookie

Saturday, November 26, 2011

a craft rookie original

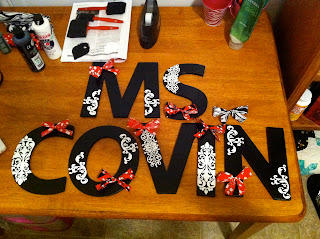
So, I told you guys yesterday that I had created name signs for my classroom and for my sister-in-law's classroom, too.  I just thought I'd share the final product of those with ya :)

This is my name sign.  I painted the letters, but didn't feel like that was enough.  So, I cut out little fabric bows and glued them for a decorative cuteness.  For some reason, it screams Minnie Mouse to me :)

Here's the letters I made for my sister-in-law.  Her favorite color is purple, so that's why I used purple fabric. Has anyone ever tried to search specifically for a muted purple fabric?? I had to go to 3 different fabric places to find the "just right" fabric, and it ended up being a fat quarter roll!  

I hung my letters in my classroom behind my desk area.  I would post what it all looks like altogether, but my classroom isn't terribly organized right now because as soon as school was over on Friday, I jetted out of there for a much-needed week-long vacay :)

I'm thinking about starting an ETSY shop to sell these letters.  My friend that I grew up with is a teacher down in Houston, and she said that she liked this idea and did letters of her own. So, that kinda makes me feel like other people might like these, too!

I'm gonna try to get her to send me a picture of her letters so I can post them here, too!  After all, I love to celebrate the craftiness in everyone!


On a completely unrelated topic....

Remember a few days ago (Thanksgiving) when I got in my car and it wouldn't start?? Remember how my neighbor came over and graciously brought my car back to life?? Well, as a token of appreciation during the time of year when we are all reminded to be a little more thankful for things, I made him and his wife some Puppy Chow/Muddy Buddies (whichever name you choose, it's still one of the most delicious and easy recipes).  Instead of just serving food, I decided to let them know why, exactly, I was thankful for them this year. 

So, I went to the store and bought a 5 lb bread loaf tin to use as the food holder.  As soon as I picked it up off the shelf, an idea was born: I would write them a letter of gratitude on the bottom of the tin so that, when they were done with their treat and throwing the tin away, they would be surprised with a nice note!


If you can't read it, it says: 

"Happy Holidays to the Neighbors who alert me to strange dogs in my yard and who came to my rescue on Thanksgiving Day. Here's some "Muddy Buddies" because you got down in the trenches and brought my car back to life :)

Thankful to you, Sarah"

Yes, they did alert me to strange dogs in my backyard. 

The best part about this: I finally feel like I'm a part of this neighborhood.  I've met the neighbors, and they are good people!

Sayonara,

the craft rookie

Friday, November 25, 2011

A Black Friday Thanksgiving!


Well, the day finally came for our family to celebrate Thanksgiving!  I didn't take too many photos, but I promise you, it was a rip-roarin' good time! 

My brother, Jon, and his wife, Melissa, hosted the event at their house, and it was a Potluck-style event!  I think about 15 people came, and, with everyone bringing a different food item, let's just say I didn't stick to my determination of not overeating this year :-/.  

Here's Jon carvin' the Turkey.  For a not-much-meat eater, like myself, this was pretty delicious.  I only had 2 bites of it, but those 2 bites were pretty savory!


Here is part of the food spread before all of it got set out. 


 The pies (and part of the Puppy Chow/Muddy Buddies I made and brought over - in the corner on the left...by the Remote Control...)


One thing I haven't mentioned yet is that my brother and sister-in-law are having a baby - arriving in the Spring :) 

Here's some photos of the day they announced the news to our family this past August:


That's Jon, Melissa, and Melissa's son, Jamison.  He's 6, and ridiculously adorable. 


This was the way that they announced!  It's a cupcake-cake.  After dinner was over, they set this out on the counter in the kitchen and just waited for people to discover it. Melissa's mom saw it first, and she started asking, "Is this real? Is this real?!" It was awesome!

About a month ago, they got the official confirmation that they are having a GIRL! You know what that means!!! Yep, another niece for me :)


They sent this to the family in a text message :)

So, I give all of this back-story to fill you in on the big exciting news from our Thanksgiving celebration.  Jon & Melissa announced the name they've picked for the baby, and it's a stinkin' cute name, too!

Melissa asked me about a week ago if I could create a cute way for them to announce the baby name. This summer, I had made these signs for our classrooms with our names on them "Mrs. Covin" for her and "Ms. Covin" for me.  She asked if I could do something similar with the colors of the baby room incorporated somehow (pink, green, and white).
What did I say?  OF COURSE! YES! SIGN ME UP!

So, off to the store I went :)

And, here's what I came up with:


The baby's name is going to be Caylin Scarlett.

Didn't I tell you it was stinking cute?!?

Happy Black-Friday Thanksgiving!

Love,

the craft rookie


turkey thanks...ummm, tomorrow?

So, because my family likes to be different, we decided not to celebrate Thanksgiving on Thanksgiving day. Weird, I know. This is especially weird this year because no one had to work today.  The Nurses, Firefighter, Salesman, etc, etc all had the day off - with exception to my brother (aforementioned firefighter) who had to work this morning and got called out to a fire at a night club just as his shift was about to end.

What does my family do on Thanksgiving when we aren't actually celebrating Thanksgiving? Well, we CRAFT of course! But not before we get some good eats in our bellies! My sister woke me up this morning with a text message: "Cream of Wheat for breakfast! Come over!" She stayed at my parents house last night with her daughter, and they know that's the fastest way to get me to commit to anything.  Just give me Cream of Wheat - any time, anywhere, any situation.

So, what's a girl to do? I got out of bed, got myself dressed, said "Bye" to the roommate's cat (who slept faithfully by my side all night long) and hopped in my car. I turned the key and nothin'. I tried again....even more nothin'. So, I sucked up my pride and went over to my neighbors house to ask them for a jump, tail between my legs, so embarassed because I realized that I left the back hatch on my car open for a couple hours last night...I was the culprit - the dirty reason why my car would NOT START! Ugh!

The neighbor graciously agreed and I was on my way to my favorite breakfast ever!

When I got to my parent's house, I, no doubt, ate that delicious meal, and then we got started on crafting.  I had a full menu of crafts I wanted to share with my sister and mom today, and I'm hoping that I didn't totally overwhelm them by the time I finally left at midnight!


The beginning of the day with us.  Notice my cute little niece, Eden, sitting in her "Bumbo" seat.  Apparently that's a work out for her little baby self.  So, while she worked out and got baby-fit, we crafted.  That sounds good, right?

First up: Making Rosettes out of Fabric strips.  My sister and I pre-shopped yesterday and got a bunch of different fabrics.  It started out a bit rough, but they got the hang of it!  I must say, I was very proud of their first success of the day!  To make a rosette, cut a LONG strip of fabric that's about 1.5" to 2" wide. Tie a knot at one end of the fabric.  Then twist the rest of the fabric so that it is loosely coiled. Use some fabric glue (I got mine at Hobby Lobby) and spin the loosely coiled fabric around the knot.  Put a dot of fabric glue on the center coil about every quarter turn (think of the flower as having a North, East, South, and West corner.  Every time you hit N, E, S, or W, put a dot of glue). When you get to the end of your strip of fabric, leave about 2 inches of fabric loose from the rosette coil.  Glue this to the back of your rosette to provide extra stability for your flower.  The end result should look like the ones below that my mom created:


Mom went a step further by adding some green leafs to the back of her psychedelic-looking one, and we put Alligator clips on the back of all of them so that she can wear them in her hair. I didn't get any pictures of the ones my sister created, though, which was a bummer because they were cute, too. 


Next: Yarn Wreaths. This was definitely an "Our eyes were bigger than our crafting attention spans" kind of project, but we faithfully plugged on (with many breaks for snacking, talking, snacking, watching the Cowboys & Aggie games, and playing with the baby). The wreaths took a very, very, very long time to complete, but they turned out super cute.  I'm not completely finished with mine, yet, but the yarn wrapping part turned out awesome! I just have to add some "embellishments" to fancy them up a bit.  Here's a picture of my almost-finished wreath:

I just love the combination of grey and pink. The cream was just a nice last-minute decision that I ended up really liking!

Here's my sister's completed wreath.  Oh, and my sister.  Say, "Hi!":

It's hard to see, but her rosette flowers are on her wreath on the right-hand side.

My sister-in-law was at the house when we started this project, and this is her cute wreath:


This has nothing to do with crafts, but my brother came by with his wife to say hi, and he got to play with Eden for a little bit while we wrapped our wreaths.   Meet my brother, Jon. Or, as I refer to him: Broseph.


 Isn't that just stinkin' adorable?

Next: More flowers. Felt flowers from a tutorial I found here. We made the flowers into hair bows, which are SUPER cute, and totally easy to make.  They take a little bit more time than I was expecting just because you have to cut out 6-7 of those stenciled flowers for the final product.  I altered this one just a smidge (because that's what I do), and I just packed them tightly together on the felt circle backing instead putting one in the middle like the tutorial said to. I ended up using only 5 of the stenciled cut-outs. 

We attached all the flowers to alligator clips, again, and I immediately put mine in my hair.

Here are the final products...All of them :)
I ended up making a "mistake" that turned in to something kinda cool on this one.  When I stenciled the flower pattern on the felt, I used black permanent marker. Then, when I cut them out, I didn't cut inside that permanent marker line so that it got removed.  So, as you can see in the picture above, there is black marker on the edge of all the flower petals.  I think it actually gives it a little depth. So, all-in-all, I'm happy with my mistake!

Does it look like I have grey hair in this photo?? Please tell me no and that I'm just paranoid!

(It's hard to tell, but this one's blue - for my mom to wear to work to match her scrubs!)

I made the white one for myself and cream ones for everyone :)


Final Project: Coasters. This was a craft idea I found on Pinterest, and fell in love with it.  So, I decided to share, it was the hit of the day!  I set out my large supply of scrapbooking paper booklets and let my mom, sister, and sister-in-law pick out whatever prints they wanted to use in creating their very own coasters. Once that happened, I had them cut out pieces of those pages that were 4"x4".  Then, I introduced them to the tiles (ivory/cream bathroom tiles from Home Depot - 16 cents!) and Mod Podge (something my sister was a novice to). 

We Mod Podged (yes, that's a verb!) the tiles, and then set the cut scrapbook paper down on it.  The best part about this is that even once you set it down, the Mod Podge is still wet, so you have time to play with it and get the placement just right (makes me wanna say "Ahhh" - like I just drank a refreshing cola beverage of my choice). 

Once that Mod Podge dries, I had them Mod Podge (there's that verb again!) over the top of the paper, let it dry, and repeat that.  We cut out felt rectangles, squares, or circles (depending on their personal preference) to use as a backing for the tiles, hot glued those on, and sprayed the front with a clear gloss water-proof seal.

Here are the ones I created.  I forgot to get a picture of my sister's and mom's sets:


We decided that my sister should make those coasters for her in-laws for Christmas with her daughters baby-feet and hands stamped on the 4"x4" squares of paper.

So, my mom and sister got little Eden to cooperate, and here is my sister creating Eden's Christmas presents to her Mimi and Paw-Paw (my parents) and her Grandma and Grandpa (my brother-in-law's parents).


My sister-in-law ended up having to leave to clean her house (because she and my brother are hosting Thanksgiving tomorrow), so we finished her coasters for her.  We packaged them with the flower I made for her and some yarn from my sister's wreath to give to her tomorrow at Thanksgiving.


My Project: an iPad sleeve! More details to come...


Happy Thanksgiving to all you normal families out there!

Love,

the craft rookie

Wednesday, November 23, 2011

first post...why i'm blogging

So, I created this blog because of my addiction to Pinterest.  Yes, I use that term as a:

- Verb: "I'm gonna Pinterest for a few hours..." (a conversation I have often with my roommate)
- Noun: "Have you been to Pinterest today?" (another conversation had with the roommie)
- Adjective: "That looks Pinteresting!" (guess who I say this to...)

That site has literally made me into a crafting FREAK! I've gotten a bunch of ideas for how to make my home more organized, pretty, and workable with the space that I've got.

The plan is to post pictures and tips for finishing the crafts that I've done.  I've made many errors on the ones I've done so far, and if I can pass on that wisdom of my ridiculousness to help someone not waste money, glue, or sanity, then my mistakes are worth it.

I'm planning on posting some of my own craft ideas on here, as well, in addition to what I've taken from Pinterest and made into my very own.  I rarely follow a craft exactly as it has been posted (Maybe because I'm rebellious. Maybe because I'm weird. The jury's still out.). So, hopefully you (I say you to the future followers **keeping fingers crossed** of my blog) will find some inspiration from my crafts and tweak them to your liking, as well!

On a side note, I am completely addicted to the new tv show "Revenge" - if you haven't seen it, do so...NOW! I'm watching it at the moment, which is probably why it's on the brain, but, nevertheless, I find it so intriguing.